
[ad_1]
Gimbals are pretty good straight out of the field nowadays. The handles and controls are completely serviceable with out spending one other dime, particularly mature methods just like the DJI RS 2 which has simply gotten higher and higher. When you begin utilizing them for prolonged taking pictures days or wish to mount another equipment to your rig then you definately would possibly discover the shape issue might use a hand.
One choice is a hoop grip, although official choices may be expensive. If you wish to learn to construct your individual on a funds this information from Bestboy Adam may also help.
This setup will not be for everybody, the DJI RS 2 is already a really succesful one-handed gimbal and is compact. Now, if you’re planning on mounting some extra equipment the two-handed grip helps hold factor balanced and gives higher factors for mounting.
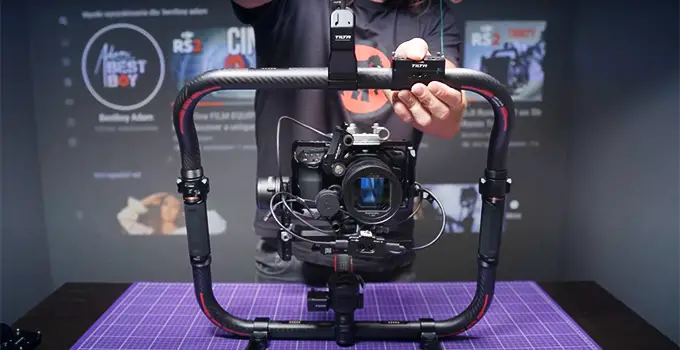
For an off-the-shelf choice, there’s the Tilta Advance Ring Grip. It’s light-weight and customized for the RS 2. It comes with each left and proper handles which you’ll be able to mount in quite a lot of configurations, plus every deal with has controls for adjusting issues like focus and different motors.
Picture Credit score: TILTA
An influence adapter then makes it straightforward to attach numerous powered units from a single space with out having too many lengthy cables working in all places. And, you may configure the gimbal deal with as a prime deal with.
The complete equipment is certainly far more practical than a barebones one-handed gimbal. Nonetheless, the additional items add a ton extra weight and measurement. It’s not one thing to only throw in your equipment for a mean day. It’s extra ergonomic although. And, it’s very costly.
If you wish to make this method extra manageable in your shoots, since holding 20 lb at arms size isn’t a enjoyable time, then Adam has a DIY assist system.
You’ll want to begin with a vest. Getting weight off your arms is vital. Adam recommends the Tilta Float belt or STIHL RTS. His DIY technique permits for some simple modifications to get all of it mounted collectively. The essential parts are all easy and do the job effectively.
Picture Credit score: TILTA
So, what else do you want?
30mm aluminum or carbon fiber tubes
20mm carbon fiber tubes
Threaded rod
32mm pulley
T cross connectors and clamps
International truss and shoulder clamps
Metal rings
Health resistance bands
Screws and washers
For the principle body design, Adam used the 30mm tubes. He opted for aluminum since they’re cheaper. You’ll take these tubes and join them with some T cross connectors. You’ll have two shorter rods on both finish of an extended rod. That is the principle body and the lengthy tube ought to stretch out of your waist belt connection as much as round your shoulders.
The subsequent half is getting the adjustable arm mounts configured. This half is what offers you free motion. You’ll want some 20mm tubes, the 32mm pulleys, small and enormous clamps, and a threaded rod a bit longer than the highest tube. Safe it with some nuts and washers in order that a bit bit is protruding of every finish of the highest tube.
That is the place you’ll mount the pulley. Twist two clamps collectively however not all the way in which in order that they’ve a bit little bit of motion after which connect these to the pulley. Do that for all sides.
As soon as that’s arrange, seize your 20mm tubes, really helpful to be carbon fiber, and put them on the open finish of the clamps on all sides. You may make an adjustable size choice through the use of a tube adapter and multiple-sized carbon fiber rods.
To handle the burden, you’ll need some type of resistance mechanism. Springs, bungee cords, and many others. are all positive, however Adam opted for some fundamental resistance bands usually discovered within the gymnasium. Put these in a rope cowl to make them look a bit higher and shield them.
Utilizing some connector clamps on every finish of the arms you may then connect some metal rings. Do that for the again of every arm and the underside of your body. Between these rings, you join your resistance bands. Additionally, add some clamps and rings to the entrance of every arm for the subsequent step.
Picture Credit score: DJI
Subsequent, you’ll want to attach all this to the gimbal. On the middle of every facet of the ring, use clamps or threads or one other mounting technique so as to add some metal rings. Now, some elastic bands can be utilized to connect the arms to every facet of the gimbal ring. It’ll present a pleasant, steady platform that may take up some vibrations.
Getting it connected to your belt or vest ought to be straightforward. Simply mount some extra 30mm clamps to it and the body ought to simply be capable of be secured onto it. Now you might be able to shoot.
This setup permits for near-ideal customization to your equipment and physique. You need to be capable of maintain anyplace from 10-30 lb with ease. Stronger parts would possibly truly enhance this load.
The secret’s that it is best to be capable of maintain extra weight for longer with out getting tremendous stressed. It’ll additionally offer you an much more steady platform for taking pictures.
If you’re searching for a complicated system however a traditional rig is a bit out of funds this DIY technique looks as if a very good deal. You will want to construct your individual ring if you wish to get this right down to a barebones worth although because the Tilta ring does add to the fee.
The footage seems nice in all of the samples. Are you curious about tackling this DIY undertaking?
[source: Bestboy Adam]
Order Hyperlinks:
DJI RS 2 Gimbal Stabilizer (B&H, Amazon)
Tilta Superior Ring Grip for DJI RS 2 (B&H)
Tilta Float Gimbal Assist System for DJI RS 2 (B&H)
[ad_2]