
[ad_1]
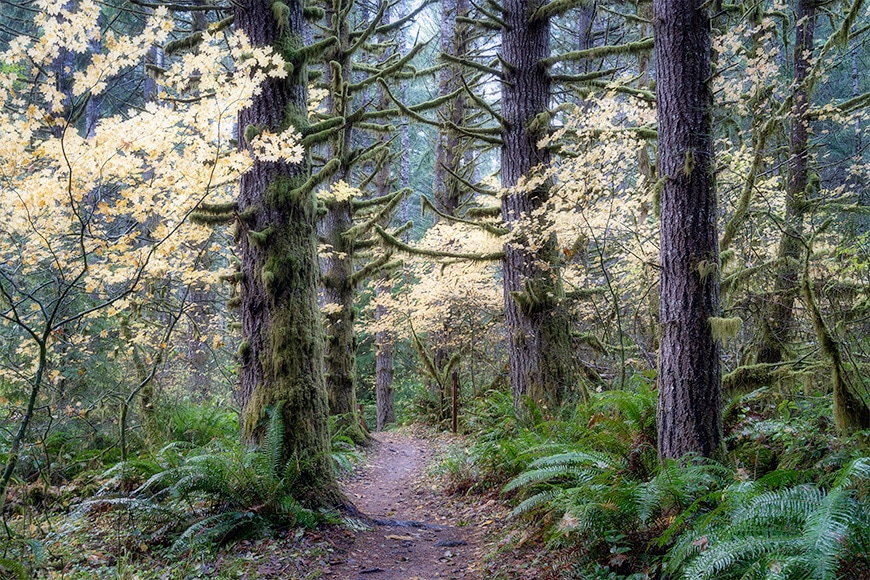
The Orton impact is a well-liked method utilized in each panorama images and portraiture, and even in motion pictures like Peter Jackson’s The Lord of the Rings. Ever discover panorama pictures that look a bit comfortable and dreamy? Possibly they reminded you of scenes from The Lord of the Rings motion pictures or appeared vaguely harking back to a watercolor portray? In that case, chances are you’ll very properly have been taking a look at a picture with the Orton impact. Many photographers use the Orton impact so as to add a little bit of “particular sauce” to their photographs. On this article, we’ll have a look at simply what precisely the Orton impact is, the way it can impression your pictures, and the best way to apply the Orton impact in Adobe Photoshop, Lightroom, Luminar AI, and Luminar 4. Prepared? Let’s soar proper in! What’s the Orton Impact? Many photographers use the Orton impact of their panorama images so as to add a comfortable, dreamy look to their pictures | Credit score: Teryani Riggs The Orton Impact was created within the Eighties by panorama photographer Michael Orton. He needed to simulate the type of dreamy glow that watercolor work have. The unique post-processing method concerned capturing at the very least two exposures of the identical scene onto transparency movie. The primary picture could be in focus and barely overexposed. The second picture could be out of focus and barely overexposed. The frames have been then sandwiched collectively right into a single picture. The top end result could be a mix of arduous and comfortable particulars all suffused with a glow that created what Michael Orton himself known as a “painterly impact.” The Orton Impact method turned so widespread with panorama photographers that when issues went digital, some post-processing packages started to incorporate it. The primary was Adobe Photoshop Components 10, the “Orton Impact” as a guided motion of their 2011 launch, however Luminar and others adopted not too lengthy after. Fortunately the Orton Impact is straightforward to create and apply to your individual panorama images. Let’s check out the way it’s performed. The best way to Create the Orton Impact in Photoshop Like most results, there are a variety of various methods to create the Orton Impact in Photoshop. The one detailed right here is my favourite. It’s quick and offers you plenty of flexibility in controlling the ultimate desired impact. Begin with a Uncooked file in Lightroom and make your fundamental edits first, together with native edits akin to those who require the Therapeutic Brush software. Don’t apply any sharpening but, as that’s finest performed afterwards. When you’re completed with the essential edits, ship your picture over to Adobe Photoshop. In case you want to do non-destructive modifying (elective), create a Good Object by right-clicking on the photograph, scrolling down the menu and deciding on Edit In > Edit as Good Object in Photoshop. This can mean you can come again and make adjustments to the picture afterward. Subsequent, you’ll must make a duplicate of the background layer. In case you’re utilizing good objects, right-click on the background layer. This can open up a menu that features New Good Object Through Copy. In case you’re not working with Good Objects, choose Duplicate Layer by utilizing the keyboard shortcut: with the background layer chosen, press command-J Mac or CTRL-J on Home windows. Do that once more so that you’ve two further layers. Rename the center layer Blur and the highest layer Sharpen. (I preserve the background layer as a reference. Right here it’s renamed “Authentic” and unlocked.) Be aware: Strictly talking, you actually solely want two layers – Blur and Sharpen. I do that course of with three as a result of I wish to have the bottom layer as a reference. We’ll be working with the Blur layer first. Sharpen ought to be on prime and invisible. As soon as that’s performed, uncheck the attention to the left of the Sharpen layer to make it invisible. It ought to appear like the layers panel within the picture above. Subsequent, click on on the Blur layer and navigate to Gaussian Blur. (Filter -> Blur -> Gaussian Blur.) With the center layer chosen, click on on Gaussian Blur within the filter menu. As soon as the Gaussian Blur field pops up, you’ll want to decide on a radius. This will likely be completely different relying on the picture and what digicam you’re utilizing, however a very good start line is to make the radius equal to the variety of megapixels the picture was shot at. This forest picture was shot at 24 megapixels, so I’ve set the radius worth to 24. The bigger the radius, the stronger the glow and dream-like impact. It’s alright to make it somewhat robust, as we’ll be adjusting the layer opacity later. Subsequent, we’ll want so as to add distinction. That is performed by going to Picture -> Changes -> Ranges. (It may also be performed with a Curves Adjustment Layer.) Pull the shadow slider far-right and the spotlight slider far left till there’s plenty of distinction. Once more, since we’ll modify the opacity later, we are able to go fairly robust right here. Right here I’ve pulled my shadow slider into the worth of “19” and the highlights slider to “213.” Now that your picture is all blurred and contrasty, make it invisible by decreasing the layer opacity to 0. Look away from the monitor for a second earlier than coming again to the display screen and slowly adjusting the opacity again up, including the blurred layer in little by little. Slightly goes a good distance right here! Relying on how robust you made this impact layer, you shouldn’t actually need something past 8-25%. I’ve set mine to 17% for this picture. The Gaussian Blur provides a pleasant glow, but it surely additionally reduces a few of the element and texture in your photograph. In consequence, we’ll want so as to add that again in by way of the Excessive Move filter. First, return to the layers panel and make the Sharpen layer seen. (This can momentarily cover the Orton Impact layer.) Subsequent, go as much as the highest menu and hit Filter -> Different -> Excessive Move. The field that pops up will ask you to decide on a radius measurement once more. Select a price that simply makes the sting outlines within the photograph seen. In a full-size Uncooked photograph, that will likely be someplace between 2.8 – 3.2. Once more, the radius worth will depend on the digicam used to seize the picture. I have a tendency to make use of someplace between 2.8 – 3.2. The define of your picture’s edges ought to simply be seen. To mix the filter into the photograph, go as much as the Mixing Modes pull-down menu and select both Smooth Mild or Overlay. Subsequent, use the layer opacity slider to fine-tune how a lot element you wish to add again in. If there are areas you wish to stay softer than others, use a layer masks. In case you like, you may add the 2 prime layers to a bunch after which modify the group’s opacity. That is additionally useful if you wish to add a layer masks to regulate the place the Orton Impact is utilized. The ultimate picture can have a mix of each comfortable and arduous edges, in addition to a dreamy glow. There are different methods to use the Orton Impact in Photoshop, however this technique is each straightforward and highly effective. The best way to Create the Orton Impact in Lightroom Whereas not fairly the actual factor, we are able to come to a reasonably shut approximation of the Orton Impact in Lightroom. When you’ve performed your fundamental edits, go to the Presence Panel within the Develop Module. First, lower the Readability by shifting the slider to the left. Unfavourable readability will blur out a few of the positive distinction within the midtones whereas including white to the midtones. For portraits, I’d recommend someplace within the -10 to -45 vary. For regular panorama photographs, -5 to -10 will normally be sufficient. For foggy and/or dreamy panorama pictures, you may go as much as -45. Subsequent, modify the Texture. Lowering it (to the left) will cut back the micro-contrast, making the picture softer and dreamier. Growing it is going to add a little bit of the element again in. In simplistic phrases, the damaging Readability is what creates the comfortable glow, whereas the damaging texture is what creates a “painterly” impact. One side to having the Readability and Texture within the damaging, although, is that it’ll blur out a few of the finer particulars. To compensate for that, enhance the Sharpening. (Be happy to make use of an adjustment layer to simply goal vital particulars whereas leaving the remainder of the picture comfortable.) When creating the Orton-like impact, your picture is prone to lose a little bit of distinction. Most photographs will profit from including distinction again in at this level. That’s it! Whereas not fairly the actual factor, it’s a bit much less concerned than creating the Orton impact in Photoshop. The best way to Create the Orton Impact in Luminar AI Luminar AI makes it even simpler to use the Orton impact to pictures. Course of the photograph as you usually would after which navigate all the way down to the Glow filter within the Inventive part. Beneath Sort, you’ll see two completely different Orton results: Orton Impact and Orton Impact Smooth. (Smooth Focus additionally can provide an Orton-like look, so attempt it out too.) Be aware: Luminar’s sliders actually pack a punch, so go straightforward on them! Personally, I desire a really refined Orton Impact, so I’ve solely moved the slider to 12. Even that a lot has made my picture lots brighter. If a excessive key photograph isn’t what you’re going for, click on on the Superior Settings. There you’ll be capable of dial within the softness, brightness, distinction and heat to seek out the look that works finest in your photograph. As traditional, depart the sharpening to the tip. The best way to Create the Orton Impact in Luminar 4 Making use of the Orton Impact in Luminar 4 is fairly much like utilizing the Orton Impact filter in Luminar AI – it’s simply positioned in a unique place. Within the Edit Module, navigate all the way down to Portrait. The Orton Impact is the final filter within the Portrait set. Clicking on it provides you with the choice of Sort 1 or Sort 2 Orton Impact, in addition to a complicated settings panel and a layer masks choice. Right here’s the earlier than and after: This method is anticipated to be related within the newest Luminar Neo launch too. Remaining Phrases Whether or not you create Orton Impact photographs in Photoshop, approximate it in Lightroom, or use the Luminar filter, you’ll be amazed on the distinction it may well make, remodeling an peculiar picture into one thing extraordinary. In actual fact, most photographers use at the very least somewhat of the Orton Impact of their panorama images. Many others love the comfortable glow it creates in portraits. Both method, it’s an exquisite method to have in your toolset. Simply keep in mind, when utilizing the Orton Impact much less is actually extra. What about you? Have you ever ever used the Orton Impact to boost your portraits or panorama images? Do you assume it’s a magical software or sorely overused? Tell us!
[ad_2]