

[ad_1]
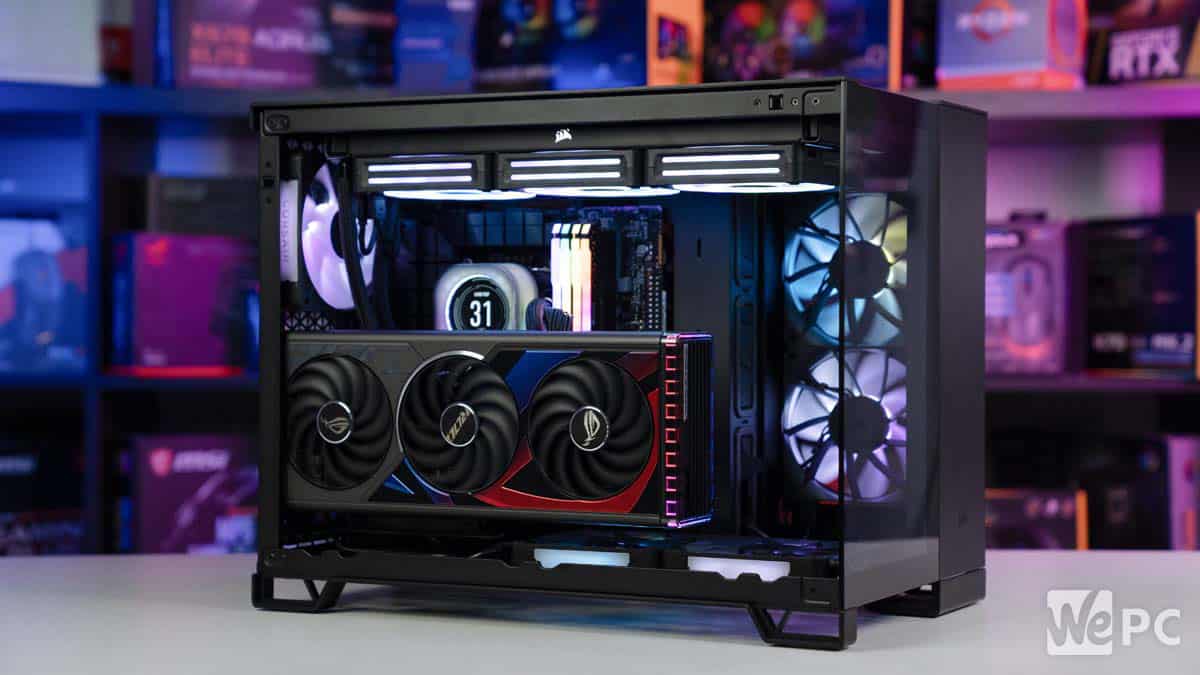
We put the cable-hiding credentials of this Corsair dual-chamber case to the take a look at Up to date: Apr 12, 2024 4:16 pm WePC is reader-supported. While you purchase by way of hyperlinks on our website, we could earn an affiliate fee. Costs topic to alter. Be taught extra Desk of Contents Desk of Contents SPONSORED PIECE In our evaluation of the Corsair 2500X PC case we famous its largest energy was its help for ‘cableless’ back-connect PC builds, although sadly we didn’t have the parts on the time to make a totally operational one ourselves. Nicely, now we’ve, and we’re fairly happy with the top outcome! We determined to place collectively this construct with an AIO cooler setup and a vertically mounted GPU as a little bit of a take a look at of the case’s full capabilities. Learn beneath for our experiences in placing collectively this lovely beast, the parts we used, and what it is best to keep in mind if trying certainly one of these builds your self. What’s a again join PC construct? Again join motherboards are these which have all of their cable mounts situated on the again/underside, in order that the entire wiring is situated within the again chamber of the case, liberating up the principle chamber of the PC to have a nicer aesthetic look and higher air circulate. Though this expertise has existed for a few years now, these boards have actually began to take off in 2024, and certain characterize the mainstream way forward for PC constructing. Varied PC circumstances have additionally been launched which might be designed to be absolutely suitable with these motherboards, having the required holes within the motherboard plate to feed the wiring by way of into the again chamber, and the house inside the again chamber for the extra cable size. These embody a spread of ‘dual-chamber’ circumstances from Corsair (such because the 2500X/D and the 6500X/D), so named as a result of the again chamber is nearly as massive as the principle one, giving ample house for cable administration. There have even been a couple of back-connect graphics playing cards launched which connect with a PCIe Excessive-Energy connector and graphics card high-power slot on the motherboard for his or her energy, which in flip connects to the PSU. This removes the necessity for the lengthy energy cable to snake immediately from the GPU to the PSU within the again. Earlier Subsequent Earlier Subsequent What we included in our back-connect construct Though again join builds have gotten more and more widespread, there’s nonetheless not a large variety of circumstances and motherboards on the market that do help this tech, and those who do aren’t all the time suitable with one another, so step one is to make it possible for your whole parts are earlier than you pull the set off. Corsair kindly provided us with the case, vertical GPU mount, and a full array of the most recent RX120 RGB followers and a LCD iCUE hyperlink H150i AIO cooling system, plus we used our personal Corsair PSU and RAM that are our go-tos of selection anyway, and an iCUE LINK Cable package. We’d strongly advocate getting a cable package for those who’re placing collectively an analogous AIO construct to make sure you have a ample variety of the longer cables, providing you with extra flexibility relating to part positioning. The TUF GAMING B760M-BTF WIFI motherboard was kindly provided by ASUS (for those who’re utilizing DDR5 RAM you’ll need to choose the D5 variant, and D4 for DDR4), and we used an ASUS ROG Strix RTX 4070 Ti SUPER graphics card that we had in inventory, plus an Intel Core i9-12900KS processor. 9x 120mm / 4x 140mm + 3x 120mm High: 360mm, 280mm, 240mm Aspect: 240mm Backside: 360mm, 280mm, 240mm Rear: 120mm ASUS TUF GAMING B760M-BTF WIFI D4 12+1 DrMOS (with enlarged VRAM heatsinks) 1 x PCIe 5.0 x16, 1 x PCIe 4.0 x16, 1 x PCIe 4.0 x1 slots, 3 x M.2 slots and 4 x SATA 6Gb/s ports 1 x DisplayPort 1 x HDMI 1 x Line In 1 x Line Out 1 x Mic-In 1 x RJ-45 4 x USB 2.0 2 x USB 3.2 Gen1 Kind-A 1 x USB 3.2 Gen1 Kind-C 1 x USB 3.2 Gen2 Kind-A 1 x USB 3.2 Gen2 Kind-C 1 x USB 3.2 Gen2x2 Kind-C ASUS ROG Strix RTX 4070 Ti Tremendous OC 2,670MHz increase, 2,340MHz base 336 x 150 x 63 mm ( 13.22 x 5.9 x 2.48 inch) Corsair 2500 Collection Vertical GPU Mount Equipment 1x Vertical PCI Mounting Panel, 1x 125mm PCIe 4.0 Riser Cable 2x Lengthy Standoffs, 4x Screws Corsair iCUE Hyperlink H150i AIO 360mm 15.63 x 4.72 x 1.06 – inches CORSAIR iCUE Hyperlink RX120 RGB 120mm PWM Followers with iCUE Hyperlink System Hub as much as 4.38mm-H2O of static strain Corsair iCUE Hyperlink Cable Equipment Corsair Vengeance RGB Professional 16GB (2x8GB) DDR4 4000MHz Samsung 960 PRO Collection – 2TB PCIe NVMe – M.2 Inside SSD Placing it collectively For those who’ve ever constructed a PC earlier than then you definately shouldn’t have any subject with constructing a back-connect rig, at the very least with this 2500X case anyway. The case carried out admirably, with loads of gaps to run cables by way of out of sight, plus ample holes by way of which cable ties and so forth. will be looped round within the again part to assist in cable administration. For a not-so-big case it felt fairly roomy inside. Becoming the AIO and followers Earlier Subsequent Earlier Subsequent Because the GPU can be taking over a lot of the underside of the case, we positioned the 360mm iCUE LINK H150i AIO radiator on the highest, with the top with the protruding cooling tubes dealing with the rear of the case in order to enhance the aesthetics when wanting by way of the glass entrance panel. We loosely fastened the radiator to the highest rail with 4 screws solely at first (in case some adjustment was required – which it was) then affixed the water pump on prime of the CPU. Following the set up of the GPU, we tucked the liquid tubing behind it as neatly as potential. Previous to this although we added the opposite case followers. Apart from the AIO radiator, we used 5 extra 120mm followers in whole – initially we have been planning on utilizing six however we needed to take away one from the underside of the case to permit the vertical GPU mount to suit. These newer Corsair RX120 RGB followers are constructed with a glass fibre strengthened liquid crystal polymer that improves airflow, offering as much as 2,100 RPM and 74.2 CFM of airflow / 4.38mm-H2O static strain. They’re additionally good and quiet, partly because of their magnetic dome bearing, and will be set to ‘Zero RPM Fan mode’ inside the software program, permitting them to change off ‘throughout low load durations for near-silent operation’. Together with the cooler they’re absolutely built-in with the iCUE LINK ecosystem, which you’ll be able to learn extra about by clicking the hyperlink to our devoted information. The brand new connectors these Corsair followers include make wiring the entire thing considerably simpler than it was, with a single connection powering the fan and the RGB on it. The followers can all be interchangeably fastened collectively utilizing little stubby connectors, in a kind of Lego-like style; these connectors additionally transfer energy between the followers, so that you solely want one cable working from the top fan of a financial institution of three which were related collectively, in an effort to energy the whole thing. The fan casings are magnetised so have a level of stick whenever you press them towards the case; you’ll nonetheless have to screw them on to affix them correctly, but it surely makes doing in order that a lot simpler. To notice: the a part of the construct we had to consider most was connecting the entire followers and AIO collectively onto the small sq. iCUE LINK System Hub situated within the again chamber (see its image underneath the ‘again compartment’ part beneath), which has two suitable connection ports. You’ll be able to daisy chain the entire followers and AIO system collectively, with the ultimate part linking to the hub, and they need to all work: every of the 2 connections is able to supporting as much as seven totally different units, so the hub can help fourteen in whole. We discovered the smartest answer to be to attach the underside followers to the facet followers with an extended cable working alongside the underside of the case (with the surplus size tucked away into the again compartment), and a shorter cable connecting the facet followers to the hub across the again. We additionally related the rear fan to the AIO radiator, which then ran its cable by way of the again to the hub’s different socket. The GPU Earlier Subsequent Given the draw of this setup is what the case appears like from the entrance, we took a extra pragmatic strategy to cable administration around the again: prioritising ease of entry for upgrades and modifications (together with to the iCUE Hyperlink hub) relatively than tightly clamping every thing down for aesthetics functions. You possibly can get higher outcomes for those who took longer, although it’s all the time going to be a bit cramped on a back-connect construct of this dimension. Finally, given the quantity of cabling that results in the again compartment in back-connect builds, you’re going to should cope with a good quantity of wiring, though the extra house provided by the dual-chamber building of the 2500X did assist significantly. If you’d like more room for a tidier setup, then we’d advocate the bigger Corsair 6500X, which is nearly the identical case, simply larger. As ever it’s a good suggestion to verify all of your case wiring is fitted to the motherboard earlier than placing within the PSU, and we fitted all the facility cabling to the PSU earlier than we screwed it in. The again compartment Earlier Subsequent Earlier Subsequent Given the draw of this setup is what the case appears like from the entrance, we took a extra pragmatic strategy to cable administration around the again: prioritising ease of entry for upgrades and modifications (together with to the iCUE Hyperlink hub) relatively than tightly clamping every thing down for aesthetics functions. You possibly can get higher outcomes for those who took longer, although it’s all the time going to be a bit cramped on a back-connect construct of this dimension. Finally, given the quantity of cabling that results in the again compartment in back-connect builds, you’re going to should cope with a good quantity of wiring, though the extra house provided by the dual-chamber building of the 2500X did assist significantly. If you’d like more room for a tidier setup, then we’d advocate the bigger Corsair 6500X, which is nearly the identical case, simply larger. As ever it’s a good suggestion to verify all of your case wiring is fitted to the motherboard earlier than placing within the PSU, and we fitted all the facility cabling to the PSU earlier than we screwed it in. Beginning it up Earlier Subsequent Assuming you’ve gone by way of the method of putting in Home windows on the SSD/HDD you’re utilizing and put in all the required drivers, the subsequent step to get your followers and AIO working accurately is to make it possible for the iCUE LINK software program is put in and (that is essential) absolutely updated with the most recent software program and firmware (you may test this inside settings by clicking the cogwheel icon within the prime proper). For those who don’t do this you will discover components of the RGB don’t work accurately, significantly for those who’re utilizing a mixture of parts. After doing this, we advocate restarting the pc, then opening up the software program once more. As soon as the appliance is updated, navigate to Residence > Lighting Setup (underneath the Hyperlink System Hub part) and comply with the setup wizard.From right here you may setup numerous animations, layers, and groupings for the totally different followers and parts. Below {Hardware} Lighting you too can set some extra restricted results that may function even when the iCUE software isn’t working. Fan Management may even allow you to setup customized RMP curves and profiles for various eventualities.
[ad_2]